Space Planning ended up being quite intriguing to me. The assignment was fairly straight forward - take an imaginary client with an imaginary space and turn it into something completely different. In this case, we were to turn an old gutted train depot (who has really ever seen one of those in this area of the country...) and repurpose the first floor into a dance/art studio and the second floor into living quarters. While trudging through this seemingly gigantic problem, we were taught the finer points of space planning:
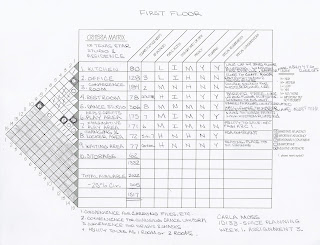
1) Prototype, Criteria Matrix and Adjacency Matrix - These documents sound boring but in reality they are like a huge puzzle. These charts, diagrams and matrices allow the designer to put down on paper where items need to be and which parts of the design need to be near one another. In other words, you don't want a bathroom in the smack dab middle of your kitchen but it might be good to have it near a changing room. Below are a few of the documents from my project.
A look at my criteria matrix...
2) Bubble Diagrams - Step 2 in the process involves taking the information from the above step and integrating it quickly into a rough floor plan. The designer accomplishes this by taking the shell of the space and sketching bubbles and/or circles quickly. Why so rough? This step allows the designer to place all of the criteria for the space and be able to rearrange without wasting a whole bunch of time.
3) Block Plans - After completing the "bubble diagram" with all the necessary components, step 3 is to ramp up the rough draft and create block diagrams of the space - similar to the one below.
4) Evaluate Codes and Requirements - Probably the most intensive step is this fourth one. The designer must be able to locate and evaluate the local codes for the buildings - historical, special needs/handicap access, fire, etc. Then plan accordingly with that information.
5) Schematic Design Floor Plan - This is where the fun begins....this floor plan is not the final cut but it is one step closer to completion. Furniture, architectural features and the like are transferred onto this paper. It's the plan most people think of when they think of a designer working up plans.
6) Furniture Plan - Finally, we select and draw in furniture with even more detail - including this time where the electrical outlets and also the lighting will be positioned.
In a unique twist, my professor at the end of the semester, posed an thought provoking essay question to us on the exam. Below is the question in it's entirety:
Some designers are able to envision a three-dimensional (3-D) space as they start space planning. The essence of the space as a whole develops from a pictorial view in their minds along with associated furniture and design elements. Other designers rely upon the space plan as a step-by-step process to graphically design the function while meeting the client's needs. Did you develop the character of the design from the plan, or did you envision and then plan? In your opinion what is the primary function of the space plan?
WOW! I had never really thought of which type of designer I was becoming but relished the chance to do some self examination. Through out this course, I consistently envisioned the 3-D space --- loft space, exposed brick, hardwood floors, mirrors and bars for dance, colorful stools pulled up to gorgeous tables and a luxurious master bath in the living quarters. Although my original impressions of the space held true, in the end my ideas were refined resulting in better flow and design improvement.
In my opinion, the primary function of a space plan is to provide a logical way to bring multiple ideas into a FUNCTIONAL design solution. Ideas become reality through a series of working documents that help the designer explore a ton of options. As you work, each idea results in a clearer picture of the design solution without hindering the imaginative process. . INTERVIEWS, RESEARCH and DIMENSIONS bring shape to the initial space. While ANTROPOMETRICAL DATA, ERGONOMIC needs, CODES and UNIVERSAL and BARRIER-FREE design all result in changes and ideas that push the design further. These changes result in the one initial vision transforming to multiple design possibilities. Our textbook recommends producing THREE SCHEMATICS for each project and I couldn’t agree more. This allows the project to "become more dynamic and versatile". BUBBLE DIAGRAMS, BLOCK DIAGRAMS AND SCHEHMATIC PLANS all challenged my ideas, and a better plan resulted. In the end, a thorough final plan is produced which is perfect for communicating ideas to a client.
Despite the fact that I will always have pictures popping into my head when I initially look at a space, I will no longer assume they will automatically fit properly. The space planning process will test those ideas and in the end I will have a stronger design. This course has changed the way I approach the design process. I no longer have to rely on design board pictures, words and chicken scratch napkins to communicate ideas. Now I can produce a professional graphic illustration of what is happening in the space.
So, even though I don't anticipate a phone call from NASA anytime soon asking for redesign, I now stand fully equipped to employ a step-by-step process that pushes my design to its fullest potential for my clients here on earth. And now I'm off to my next adventure...Perspective on Thursday. Remember the days of a break between classes?
Still maintaing an "a" average-
C


No comments:
Post a Comment