Showing posts with label School/Conferences. Show all posts

Tuesday, June 21, 2011

Class Update: AutoCAD

"As far as I'm concerned, progress peaked with frozen pizza."  Although this quip is aptly spoken by Die Hard 2 main character John McClure of movie fame, it's quite obvious to me that this dude had never taken an AUTOCAD class.  This class was worth the long wait.  Finally a skill that make me much more marketable - time to update my resume!


Why all the fuss about AUTOCAD?  Simply put, AutoCAD is a software tool that allows a designer to create: floor plans, elevations and furniture plans.  Designers, builders and contractors use this ingenious tool to communicate building and design plans. 


Model space is where it all began for us.  It's like having a white (or black in this case) board with all your plans in it. From that board, we created multi level house complete with stairs and wall elevations.  This was just the tip of the AUTOCAD iceberg.


While I was learning commands (like FILLET, MIRROR, VIEWPORTS) we also learned to work in paperspace.  By putting our designs on humongo paper, we were able to view and discuss them during the class.  Alot like manual drafting but quicker and much more attractive thanks to the computer.  I guess you might call it a mix of old school and new school techniques. The outcome is spectacular!


Here are my kitchen and bath elevations, complete with dimensions and notes. And let's not forget the title bar.


Then there is the Furniture Plans (which all designers complete).  With layering in AUTOCAD, we were able to turn off certain elements of our design so that we could evaluate just one certain item.  In this case, it is furniture.  By turning off the dimension on the drawing, you are able to examine exclusively the furniture arrangement.  


Although I learned mainly with a recorded tutorial, I was required to interview a current AUTOCAD user.  So I picked Celine - my friend and co worker at Marco French Studio.  Below is an excerpt of my Q&A with Miss Celine:


Q1: When do you use CAD in the production process (e.g. preliminary design, design development, etc.)?
We use CAD during design development and to finalize a design.  The precision of CAD helps ensure that there will be no mistakes in size or scale.  We use it for furniture layouts as well as window elevations that show the various treatment options, etc.  It also helps once selections have been made - CAD is also essential to designing custom items such as: cabinets, chests, chairs, tables, etc.

Q3: What are the advantages or disadvantages that CAD brings to your practice?
Advantages:  CAD is accurate and you are able to make quick changes to drawings all the while looking professional.
Disadvantages:  You get out of practice with hand-sketching.  But most importantly, everyone has different drawing style, even in CAD,  making it difficult to pick up where someone left off.

Q8:  What advice would you give a students, people in my online class,  who are learning AutoCAD and hope to utilize it in the future?
Find an internship where you can use it or just be sure to keep using it as much as possible.  It all comes with practice and unlike some of the things you learn in school, this will be one of the important skills you are expected to have.  In fact, in one of my interviews, I was asked to create a floor plan in AutoCAD and it was timed.  I did very well and someone else got the job, but it just goes to show you that it’s an important skill to have and your employer will expect you to use it.

Thank you, Celine, for your insights into the real workings of CAD!


Overall, I got a real kick out of this class.  The software is fairly intuitive and so it flowed somewhat easily.  (maybe it was all those long hours spent slaving away in my former life as a business consultant at Accenture). Whatever the reason, I knew from the beginning that CAD would be the most valuable class to complete early on in my course work.  So, I finagled schedules so that I could get to it fast.  My advice is that you do the same.  


Despite what Hollywood may tell you in their flicks, technology is the bomb!  Specifically, CAD.  Remember...pizza is good but CAD is better.  Maybe not as good for your tummy but definitely better for your waistline plus CAD keeps you current in the job market.  Stay tuned for Modern Art to follow after a 3 week hiatus from school...


Off to the beach -


C

Tuesday, May 24, 2011

Class Update: Theory of Development of Form (3D)

Tradition holds that the great philosopher Plato had engraved above the doorway to his academy these words: "Let no one ignorant of geometry come under my roof."  Powerful words from a highly intelligent man but up until this point, I might have considered this quote to strictly apply to math majors and history geeks.  That is, until this semester.  Another 6 weeks has come and gone with yet another design class being checked off the requirement list.  This time around, my battleground was 3D - compliments of AI Online...
Ascending the throne of my final project!

Taking cues from the classical thought process of Plato, the 3D class at AI Online proved to be both exhilarating and enlightening.  No more was I student in the flat medium known as 2D with the strict boundaries of width and length but now depth was added to the recipe - a part of everything that we did for class.  

Weekly assignments consisted of constructing an object - usually built out of bristol paper.  Bristol paper gave way to basal wood capping off the course with corrugated cardboard.  

My first attempt using basal wood.

There was lots to learn about planar nets, Archiemdean Solids and the 5 Platonic Solids.  The aforementioned Greek mathematician and philosopher Plato discovered that there are five "perfect" three dimensional solids.  And only five.  They include: 
Not being ones to shy away from anything daunting, we embarked on a journey to create on the lovely objects above.  Below is a picture of the Octahedron that I constructed as well as a folder from bristol paper.   
2D beauty to 3D volume - gorgeous!

Undergraduate design classes are not the only places to discover the timeless beauty of mathematical solids. (Heck, my 4th grader made a book report from a paper dodecahedron but I'll save that for another rant... ) Designers utilize these all the time to create abiding items in their collections.  Take a look at this lamp from Ralph Lauren Home  - truly striking. 
Week 5 proved to be no less daunting -- create our own 3D composition involving symmetry, balance , proportion and harmony.  All made out of basal wood and glue.  Friends, please hold your giggles until after the show... For those of you that know me well, you know that ever since my sons were little using Elmer's at my kitchen table that I have despised the stuff.  Literally, I hate glue.  Would rather make a slept in bed a hundred times.  But, not to fear!  I soldiered through the assignment with flying colors.  But my fellow student Andi....well, that's on a different playing field.  Andi's commission was stunning.  Great job, Andi!

Our last assignment was to make a chair out of cardboard. Requirements?  Only the approved tools (x-acto knife, glue and cardboard) were to be utilized. Including the initial design, this was to be duty numero 4 for that week.  Ugghh.  Did I mention that it was supposed to hold a 200 pound person?

Desperate for inspiration, I leafed through one of my favorite books 1000 Chairs (get one!) and continued to be motivated by Charles Renee MacKintosh.  Architect, designer and artist from the 20th century , this dude can build chairs. 


The chairs below are pieces from the early 20th century.  Restaurants during that time catered to the women folk who arrived donning long dressed and fancy hats with one focus -- to chat and eat.  (sounds good to me...)  Being long and lean, these style chairs allowed for privacy while accomplishing the task at hand.  Here are my inspiration pieces:
Mackintosh chairs

Initially, I created a mock-up out of the chair out of bristol paper. The fruits are below:
Then, it was off to create the real one.  The successful construction of the chair was the inner workings as shown below.  Support was key.  It was a family affair.  For weight testing purposes, the boys in the Moss household proved to be invaluable.  
The chair in progress...the internal "support system" with interlocking cardboard

The chair was a success!  Some fringe, a cushion and an emblem topped off the entire project.  No crashes,  Yeah me!
And so concludes my journey for the last 6 weeks.  Although I am fairly sure that Plato never intended his sayings to be pertinent to our modern day theories, isn't it awesome to think that simple ideas never fade with time?  Not only did I get a great insight into the philosophers of the past, but a new paper chair to boot! Next?  CAD.  Yippee!


Off to download,
C


Tuesday, March 29, 2011

Class Update: Perspective

Time is ticking but the clock seems to have come to a long slow halt.  With another class under my belt, 5 weeks have crawled by -- but not for the reasons that you might think.  At this point in the race to become a designer, I feel like I am in the middle of the marathon with no chance of a water break anytime soon.  A graduation date of 2014 looms over my head taunting me.  Ugghh... Sure I could pick up the pace but that would leave the rest of my world in shambles.  Family, clients, job, house hunting and simply breathing takes some priority in my life.  I'm weary but willing!  Enough about me...on to the fun stuff.


So what have I been doing in school for the last 5 weeks?  Drawing, drawing and more drawing.  For those faithful few who have been with me since inception, you will recall that drawing and Carla are not friends.  Despite all of my hang-ups, my professor graciously bestowed on me the gift of an "A" in my Perspective class.  This was not won without much paper ripping and eraser blowing on my part. 
Check out this incredible student sample of an interior.  (Note: This is NOT from me.)  Although I am far from this level of beauty, I sure did learn a lot.  During the class, we learned how to draw one-point, two-point and three-point perspective drawings.  Additionally, we discovered that a composition is never complete until the shading is in place for the drawing -- including shadows placed according to the light source in your creation.
One-point perspective ala Carla Moss...

One-point perspective refers to viewing the picture head on only.  It includes a vanishing point (or VP) where all the parallel edges and lines moving away from the viewer appear to collide.  Parallel edges and lines that are also parallel to the ground plane will have a vanishing point on the horizon.  A drawing can have one or more vanishing points, with no limits to the overall number of vanishing points.  Are you snoring yet?  Hang in there with me....It gets really good!

The above drawing shows my interior design office -- in one-point perspective.  Using the vanishing point and the horizon line to begin my drawing, I went back and filled in the medium and dark shading after watching the instructional video and identifying the spots that needed some extra attention. If I had a fancy-smancy blog, you would be able to zoom in and see the texture on the drawing.  I accomplished this by utilizing paper towels, q-tips and a blending stump.  Finally, I erased away the light shadows that came in from the left window.  These steps help breathe life into an otherwise bland composition. 

The major challenge of all this?  More depth on the bookshelves and the windows.  How did I accomplish this? Searching books and spying ones in magazines/books.  I even went so far as to snap a pic of a bookshelf at work.  Armed with feedback from my instructor on how to use VPs more effectively and my discoveries, I was able to increase the lines to project depth employing vanishing points and shading.  I also did the same technique to the windows.  Whew!  Even with all my corrections, I am told that my right hand shelves are still not up to standard. 

Perspective class also included a chance to draw something from your house.  

A photo of my bedroom


 My courageous drawing attempt....

Bird's Eye View and Worm's Eye View are the other perspectives that we students attempted to master during our recent endeavors.  Bird's Eye View is just like it sounds -- you look down on the subject from a vantage point.  This type of drawing is a three-point perspective where the third vantage point is located just below the horizon. Worm's eye view (do worms even have eyes???) also has a self-explanatory namesake -- from the perspective of a worm.  Freaky but necessary.  In this one, instead of coming at it from above you obviously come at it from below.  Most of the time, one of these (worm or birds eye) ends up being easier for the student to draw.

Worm's Eye View -- strange to think of a little critter looking up at the wide world...


Bird's Eye View --- more my style and my personality.  Kinda like spiderman...
A Mary McDonald living room that I used for reference...


Taking my cue from the former projects, I began this one with the gorgeous magazine picture above for reference.  This served as a strong jumping off point for my creation -- enabling me to see the furniture shadows and reflections without having to use my imagination too much!  They served as reminders of getting the shadowing just right in my project. All with a controlled creative flair.


Take a deep breath....this is my actual project with people.  Yikes.

I won't  sugar coat the fact that this wasn't my favorite class.  Furniture, accessories, fabric and paint are the way I like to roll.  Drawing is for those who can actually do it.  However, it is a necessary evil that I needed to learn.  Frankly, I surprised myself by the fact that I could actually create any semblance of a masterpiece.  (Quick pat on my back)  Color is important but shadowing and shading do wonders for the creation. With my confidence boosted, I now have another weapon in my arsenal to wow those future clients!


So...as I come to the middle of my Art Institute Marathon, I'm off to read for pleasure and eat lunch with my long lost friends.  Time to take a deep breath and get ready for next mile in the race to "designerhood".  Next stop:  Development of Form. 


Blistered but Blissful-
C


Tuesday, February 22, 2011

Class Update: Space Planning I

With all the talk of shutting down the Space Program at NASA, you can imagine my confusion when I was assigned the class "Space Planning I" in my recent curriculum at the Art Institute - Pittsburgh Online.  (For those readers that are confused as to why I am now "studying" in Pittsburgh and not Dallas anymore, please see previous blogs from late fall.)  Much to my relief, I quickly discovered that it was not space planning in the sense of launching a large metal plane into the air but rather arranging a room.  Whew!

Space Planning ended up being quite intriguing to me.  The assignment was fairly straight forward - take an imaginary client with an imaginary space and turn it into something completely different.  In this case, we were to turn an old gutted train depot (who has really ever seen one of those in this area of the country...) and repurpose the first floor into a dance/art studio and the second floor into living quarters.  While trudging through this seemingly gigantic problem, we were taught the finer points of space planning:

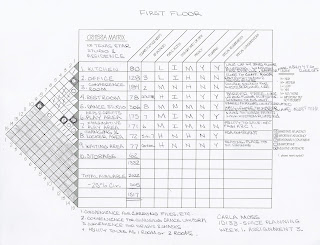
1) Prototype, Criteria Matrix and Adjacency Matrix - These documents sound boring but in reality they are like a huge puzzle.  These charts, diagrams and matrices allow the designer to put down on paper where items need to be and which parts of the design need to be near one another.  In other words, you don't want a bathroom in the smack dab middle of your kitchen but it might be good to have it near a changing room.  Below are a few of the documents from my project.  

A look at my criteria matrix...

2) Bubble Diagrams - Step 2 in the process involves taking the information from the above step and integrating it quickly into a rough floor plan.  The designer accomplishes this by taking the shell of the space and sketching bubbles and/or circles quickly.  Why so rough?  This step allows the designer to place all of the criteria for the space and be able to rearrange without wasting a whole bunch of time. 

3) Block Plans - After completing the "bubble diagram" with all the necessary components, step 3 is to ramp up the rough draft and create block diagrams of the space - similar to the one below.

4) Evaluate Codes and Requirements - Probably the most intensive step is this fourth one.  The designer must be able to locate and evaluate the local codes for the buildings - historical, special needs/handicap access, fire, etc.  Then plan accordingly with that information.

5) Schematic Design Floor Plan - This is where the fun begins....this floor plan is not the final cut but it is one step closer to completion.  Furniture, architectural features and the like are transferred onto this paper.  It's the plan most people think of when they think of a designer working up plans.

6) Furniture Plan - Finally, we select and draw in furniture with even more detail - including this time where the electrical outlets and also the lighting will be positioned.  

In a unique twist, my professor at the end of the semester, posed an thought provoking essay question to us on the exam.  Below is the question in it's entirety:

Some designers are able to envision a three-dimensional (3-D) space as they start space planning. The essence of the space as a whole develops from a pictorial view in their minds along with associated furniture and design elements. Other designers rely upon the space plan as a step-by-step process to graphically design the function while meeting the client's needs. Did you develop the character of the design from the plan, or did you envision and then plan? In your opinion what is the primary function of the space plan?

WOW!  I had never really thought of which type of designer I was becoming but relished the chance to do some self examination.  Through out this course, I consistently envisioned the 3-D space --- loft space, exposed brick, hardwood floors, mirrors and bars for dance, colorful stools pulled up to gorgeous tables and a luxurious master bath in the living quarters.  Although my original impressions of the space held true, in the end my ideas were refined resulting in better flow and design improvement.

In my opinion, the primary function of a space plan is to provide a logical way to bring multiple ideas into a FUNCTIONAL design solution.  Ideas become reality through a series of working documents that help the designer explore a ton of options.  As you work, each idea results in a clearer picture of the design solution without hindering the imaginative process. .  INTERVIEWS, RESEARCH and DIMENSIONS bring shape to the initial space.  While ANTROPOMETRICAL DATA, ERGONOMIC needs, CODES and UNIVERSAL and BARRIER-FREE design all result in changes and ideas that push the design further.   These changes result in the one initial vision transforming to multiple design possibilities.  Our textbook recommends producing THREE SCHEMATICS for each project and I couldn’t agree more.  This allows the project to "become more dynamic and versatile".  BUBBLE DIAGRAMS, BLOCK DIAGRAMS AND SCHEHMATIC PLANS all challenged my ideas, and a better plan resulted.  In the end, a thorough final plan is produced which is perfect for communicating ideas to a client. 

Despite the fact that I will always have pictures popping into my head when I initially look at a space, I will no longer assume they will automatically fit properly.  The space planning process will test those ideas and in the end I will have a stronger design.  This course has changed the way I approach the design process.  I no longer have to rely on design board pictures, words and chicken scratch napkins to communicate ideas. Now I can produce a professional graphic illustration of what is happening in the space.

So, even though I don't anticipate a phone call from NASA anytime soon asking for redesign, I now stand fully equipped to employ a step-by-step process that pushes my design to its fullest potential for my clients here on earth. And now I'm off to my next adventure...Perspective on Thursday.  Remember the days of a break between classes?

Still maintaing an "a" average-  

C

Wednesday, February 2, 2011

The Art of the Blog

"Happy Birthday to me....happy birthday to me....happy birthday dear Why Not? blog....happy birthday to me!"  Ok.  I'm a bit early, but March 10, 2010, marks the beginning of my crazy ride into blogging - the birth of this bittersweet marriage of adventure and heartache in the design world.  Many have asked me the reasoning behind it and it's really quite simple:  I wanted to share my design ideas about beautiful rooms and talented designers who produce spectacular rooms.  More importantly, I had a deep desire to document my foray into design school as a 40 something mom (in other words, if I could do it...anyone can). 
LA Designer Mary McDonald, one of my favs, graces the cover of Domino Magazine.

Now just because I like to blog doesn't necessarily make me an expert.  It became quickly apparent that there is an art to blogging that I (to be brutally honest) knew squat about.  Sure, writing is important but who wants to hear an expert drone on about topics that only the expert likes? My faithful devotees yearn for more than just words on a page- they want photos.  The formula that works best for me is :  photos + interesting topics + honesty = success. 

There are some eye-popping examples of design blogs in cyberspace.  La Dolce Vita, Material Girls and Coco-Kelley are in the favorites bar at the top of my homepage.  Follow that up with the e-zines High Gloss, Rue and Lonny.  The funny thing is that many of these creators aren't even designers by trade but just some average joes that worship design.  The thrill of my inbox bulging with these jewels makes my life complete.  With their arrivals, come fresh ideas and fresh places to buy goodies along with snapshots that I'm able to save on my mac to pass onto my subscribers. 
High Gloss was just released yesterday!  And began as the result of a team of outstanding bloggers.

Don't get me wrong.  There are some stinky blogs out there clouding the view.  Those I immediately dismissed with the push of a button - never to return to my screen.  Even with my love of design and my head stuffed with nuggets of greatness, I understand my limits.  Just like the creators of Rue, I knew that I needed a team mate to round out my rough edges.
Another great online design magazine...Rue


Enter my buddy Jen.  Part editor, part sounding board and a whole lotta of fun...Jennifer boosts my blogging to a level that easily conveys my personality to the world.  Her editing skills give me that zing in an otherwise ho-hum endeavor.  Thanks. friend. 

Enough about the past.  As with any upcoming landmark birthday, it's time to ponder the future.  Where do I want to go? Coming out of the gate first is my intense desire to get this craziness out of my head and onto the page.  I thrive on chronicling this adventure of design.  It keeps my eye on the prize.  A constant reminder of the mountain I am climbing being an baby designer along with the successes and challenges.  I want to lay bare my progression to my readers in a crisp way - whether it be a new furniture discovery, a fabu paint color or a yawner class assignment.  

Recently I have had the huge honor of becoming blog manager for Dwell With Diginity here in Dallas.  I've mentioned DWD in a prior blog and cannot say enough wonderful things about this non-profit.  The stated goal of DWD is to bring good design to those less fortunate by inspiring them through their living environment to be the best they can be in life.  In other words, bringing beauty and serenity to their homes and having that flow over into all aspects of their life.  The beauty of this project for me is that I am able to manage this from my home and still know that I am contributing to  a worthy cause.  My job description?  Lining up the bloggers and topics for the site while managing the overall flow.  Exciting!
DWD Founders Kim Turner and Lisa Robison after their appearance on Good Morning Texas.  

In thinking forward for the Why Not? blog, I realize that my blog (however spectacular in this infancy stage) can be cranked up a bit.  I would absolutely love, love, love to attend the upcoming blog conference in LA February 28th - March 1st.  This gathering will feature my personal favs:  Palmoa Contreras of La Dolce Vita, Casandra LaValle from Coco+Kelley and Grace Bonney author of Design*Sponge.
Cassandra LaValle from Coco+Kelley will be sharing tips from her successful blog.

Of course there will be designers of all sorts there for the soiree also:  Jan Showers, Barclay Butera and Tobi Fairley.  Unless a sugar daddy pops up in the next few weeks (which with my schedule, who has the time), the chances are zilch that I'll be learning from these gurus in person.  If only Harrison Ford was willing and available...Pinch self.  Wake up.
Atlanta designer and blogger Tobi Fairley will be speaking on How to Build Your Interior Design Business

Availabillity is something that I'm lacking right now.  Design school, dream design job, volunteering for DWD and Paws the new puppy (more about the name in later posts) are all vying for my time.  As of publication, Paws is winning the competition hands down with her cutie patootie puppy snuggles.  So, LA will have to pine for me this year. 
My new puppy Paws...

Time to pack up the pointy pre-birthday hats and streamers until next year.  Snap the photo for the scrapbook and move on with life.  Join me in staking claim to another milestone in my design progression.

More cake, anyone?

C  


Tuesday, January 4, 2011

Opportunity: Another Interior Design School?


New Year.  Time for reflection.  Time to take note of what is going on in life and to think about the future – what to change?  what to keep?  how to go about it? For many of us, the New Year breathes a sense of excitement as to what the upcoming year holds. Yet as my year commences, I find myself a bit more pensive than usual about 2011.

I'm always telling myself to be open to new opportunities...
(stylish door of designer Kristen Buckingham's store in LA.)

As my faithful readers may recall, the Moss clan had considered a move to Big D.  The discussion centered around both hubbie and myself being closer to work and/or school (cutting the commute and tolls in half) as well as various other really good reasons.  Also part of the diatribe, is the fact that I am absolutely in love with interior design.  I am living the life that I should have lived the first time around.  My job is wonderful.  I look forward to it every day – drive time or not.  Those two worlds (the time and the dream) often collide.  Despite the occasional, “Wow, you are living the dream”comments, my life is out of whack right now. Something has to give.

Enter the infamous pro/con lists.  With my life tilting towards crazy sidled up next to exhausted, it’s time for a new outlook.  Take the Art Institute of Dallas:  phenomenal professors, awesome classmates, and a perfect 4.0 gpa.  Cons of the Art Institute of Dallas: challenging schedule, limited class time frames and a young family that needs me around.  (A quick shout out to my homies in the hood – thank you for your tireless efforts to shuffle kids in order to make my dream come true and to you, hubbie.  You are more supportive than the typical bear with those two crazies in tow.)  So, what are the possibilities?

Monday 8:00am – 12:00pm  - Kids get on bus without me in conjunction with the aid of my neighbor for 12 straight weeks.  Monday holidays thrown in create much stress.

Tuesday 6:00 pm-10:00 pm – Head out for school at 4:45 to battle rush hour.  Drive downtown with kids so honeybun can meet me to trade boys and head home with them for dinner.  Total kid time in the car …over 2 hours.  Reminiscent of  planes, trains and automobiles.  Hubbie travel schedule picking up so out of luck on travel weeks.

Saturday 1:00pm-4:00pm –Sweet!  Honeybun at home and very little traffic.  Not so sweet.  Number one’s b-ball games at 1:00 so I will miss all of them.  Did I mention 4 hours on Saturday???

Do you see my dilemma?  It’s a never ending cycle – time away from family or time away from my life dream.  Time away from my life dream or time away from my family.

Thus emerges option numero dos -The Art Institute of Pittsburg Online Division.  I initially considered this as an option but at that time the school was not CIDA accredited.  In other words, the program would not have let me sit for the NQIUDA exam at the end of my degree.  That’s a big deal in the design world.  Low and behold, if that silly school did not gain their accreditation within recent months!  Problem solved…almost. I still need to do some more evaluation of the online option but it does offer me some flexibility that was not available to me earlier and for that I am thankful.

More time attending school in my home office?  It might be a better option....

It’s a bit of bummer, since I’m very social and love working with other people.  But the tradeoff for increased family life while still earning my degree is just something that I can’t snub my nose at right now.  Funny thing is that I have already “met” some really cool people from my online class proving that I can release my inner social butterfly just as easily in cyberspace as in real life. 

With the beginning of the year, comes the beginning of a new adventure.  Join me in taking stock of what’s spinning around in your life and press towards those things that give you pleasure – without risking the relationships of your inner circle.  Don’t be afraid to look long and hard at the opportunities available to you.  Live your dreams with confidence. Here’s to 2011!

Stay tuned,
C

Tuesday, November 23, 2010

Interior Design Class Update

Thanksgiving brings to mind for most people pumpkin pie, turkey, lots of fatty starch and even football.  I’m not immune from that thankfulness either.  Thanksgiving prompts me examine my life and give thanks for the things that are in it, too.  There’s the traditional thankfulness for my health, my family and my kids.  But this year, I am adding something new to the mix -- thankful that I am now halfway through the remaining two classes.  Yeah!

What are the things that I am thankful for this year besides being halfway through?  Here’s a synopsis of recent months:

WORK
Marco French Studio is the light of my life.  I love it there! My internship there rocks and I’m learning a ton from the master himself.  Over the last few weeks, I have been:
·      Selecting and picking up towels & robes to be monogrammed for an upcoming bedroom
·      Shopping at top notch art galleries in search of art for said bedroom
·      Searching for items to be used on the bookshelves
·      Making the bed and arranging stuff early for the upcoming reveal of the bedroom.
·      Installation of a stunning HIghland Park bedroom. It’s breath taking... The clients‘ faces say it all when they are presented with the finished product (think lots of screaming and excitement...sheer drama.  They love it btw...) 
·      Returns – Driving around for 2 hours returning all the stuff we didn’t use in the install
·      Finance & Receipts – Matching all the receipts to the billed invoice to make sure we got it correct
·      Website – Getting together a plan on how we can update the firm’s website once free time ensues
·      Shopping for more towels and a frame with a picture of the family in the new bedroom.
·      Creating a high level strategy plan
·      Looking for spectacular high-end 1940‘s articles for another upcoming bedroom.

Yes, I get paid to spend someone else’s money and do light office work.  Someone pinch me

DRAWING AND PERSPECTIVE
 Remember when I told you I couldn’t draw?  Never doubt the skills of the highly trained professors at the Art Institute of Dallas.  They have taken a once sickly artist and transformed her into a healthier artist.  Below is an example of my first 1-point perspective drawing. 


Although the drawing is not museum quality art, it does the trick.  Shading and the hardware pulls seem to be the trouble spots. For those of you who are still not sure what the drawing is -- think bedroom...

COLOR
Just when I thought my preschool days were behind me, up pops the Color class.  We have been mixing colors and painting like crazy.  The mixing and experimenting is all part of learning the capabilities of the colors to get the exact one that you need to use.  Crayola had nothin‘ on us.   We had to paint 84 colors by mixing them!  No combining colors to make a new one -- we did the whole thing from scratch baby!  You can imagine the state of the bathroom at the school during the process but we cleaned up after ourselves.  (No need to freak, mom.) Once the colors were mixed, we had to create some type of artwork to display them in an orderly fashion.   

For those die hards who have been following my blog this whole time, you will remember that I am crazy over “The Dress” from my previous post "The Dress" done by artist Todd Murphy.  Inspired by what may be easily considered my all time favorite piece, I created my own take on “The Dress” featuring all 84 colors!  I wish I had been able to spend more time on the project but it works and showcases my effort very nicely.

INTERIOR DESIGN BASICS
With three major projects due each week, this class almost killed my design aspirations and me.  It was intense.  Despite all the workload, I did learn a ton.  Nothing that was too mind-bending but certainly time consuming!

Below is my final board for my Basics class.  The best way to describe it is as a summary of all my assignments.  The class was required to draw a floorplan, pick out furniture, flooring, paint, fabrics -- the whole shabang!  Take a look at mine :

What’s always been funny to me is how simple this process looks and yet how complicated it really is to do.  Talk about long hours and tedious work...

With the class over and my final grade of an A recorded, I’m going to sleep for a few days and let my mind breathe.

NEXT QUARTER
And since its mid-semester you know what that means....time to register for next quarter!  I’ve signed up for three more classes including:  Design Basics (a 3D drawing class), Space Planning  & Programming I (where I learn how to arrange furniture) and Observation Drawing (drawing in perspective).  I’m making progress, but it’s so slow…Graduation target -- 2014.  Ugh!  That would mean that I would have to take 3 classes each quarter which is a better blend for my family and my work.

That’s the latest in the life that is Carla Moss.  Oh, except for the fact we lost the house we were going to purchase - the one I talked about last blog.  Someone bid higher and had no contingency.  I'm a bit sad.  So...off to my parents for Thanksgiving to see my family and eat with my hubbie and the kids in tow.  Maybe while I’m there, I’ll take a much needed breather also. Goodbye Frisco, hello Branson (at least for a week).

Gobble, gobble-
C